Luminous Bodies
Shape and aim the suns, moons, and other emitters that light your scene.
Where to Find It
- Open the 3D Viewport N-panel.
- Go to True-VFX -> TrueSKY 3.
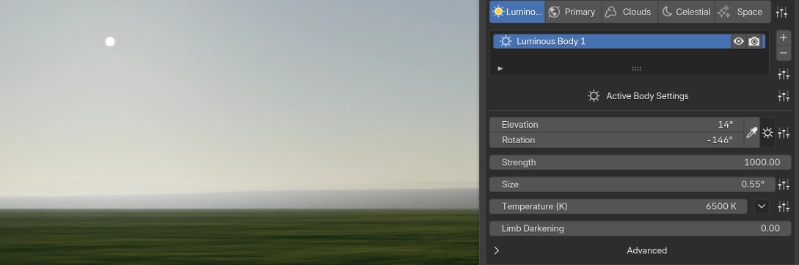
- Click the Luminous tab at the top of the panel.
When to Use This Panel
- Set the main sun or moon position, size, and brightness.
- Add secondary emitters for sunsets, eclipses, or fill light.
- Sync lighting to a real location, date, and time with Global Positioning.
Quick links
Panel Layout
- Luminous Bodies list to select, rename, and toggle bodies.
- Add / Remove controls beside the list.
- Preset picker below the list to save or recall multi-body lighting setups.
- Body controls underneath, grouped by placement, brightness, color, and shape.
Key Sections
Body List and Presets
- Use the + / - buttons to add or remove bodies.
- Pick a Preset under the list to store or apply full lighting rigs (direction, size, color).
Placement and Global Positioning
- Elevation / Rotation set the angle above the horizon and the compass direction.
- Click to Place lets you click in the viewport to position the light visually.
- Placement presets store only the angles so you can swap sun directions without changing brightness.
- Use Use Global Positioning (inside Advanced) to sync this light to the scene-wide Global Positioning tab.
- Override lets you set a per-light Location or Date & Time when you need an exception.
- Offset modes shift the global values; Full Override replaces them entirely.
- If the light has been rotated manually, run Align GPS to Body in Global Positioning to sync the scene-wide date/time and north offset.
Date & Time overrides
When Use Global Positioning is enabled, the Date & Time section lets you: - Switch between Offset and Full Override modes. - Use Sunrise or Sunset buttons for quick lighting presets. - Click Use Current Date/Time to snap to the present moment.
Placement pitfalls
Click to Place works best from a perspective view. In orthographic views the computed angles can be inaccurate.
For fast viewport placement and direct gizmo edits, use the Scene Builder tool. See Body Gizmos.
Brightness and Disc Size
- Strength controls how strongly the light affects the scene and volumetrics.
- Size sets the apparent disc diameter and shadow softness (small = crisper shadows).
- Size presets let you flip between sharp midday and soft golden-hour looks.
Color and Disc Shape
- Choose Color Temperature for natural blackbody tints or Color Picker for stylized hues.
- Use Color presets to swap warm/cool looks without touching position.
- Limb Darkening adjusts how bright the disc center is versus its rim for a natural falloff.

Advanced (per body)
- Inspect or reassign the underlying light object if you need to troubleshoot visibility or links.
Typical Workflows
- Dial in a primary sun: After Scene Setup, adjust Strength, Size, and color, then place the sun with Elevation/Rotation or Global Positioning so shadows and highlights match your shot.
- Add a gentle fill: Create a second body, lower Strength, enlarge Size for softer shadows, and tint slightly cooler for moonlight or neutral fill.
- Match a real time and place: Open Global Positioning (Misc -> Positioning), search for a city, set date/time, keep Auto Update on, and render test frames to confirm the mood.
Tips & Pitfalls
- Start with one body before layering extras; it keeps exposure balancing simple.
- If skies look flat, reduce Strength on fill lights instead of overdriving the main sun.
- Save presets once you like a multi-body setup so you can recall it across scenes.
Related pages